Remote IoT SSH On Windows 10: Setup & Guide
In an era defined by unparalleled connectivity, have you ever considered the transformative power of secure, remote access to your devices and systems? The implementation of a reliable SSH server is no longer a luxury; it's a necessity, fundamentally reshaping how we interact with our technology, regardless of location.
Whether your domain lies in the intricate world of software development, the critical realm of system administration, or simply the pursuit of technological fluency, understanding and implementing secure shell (SSH) is becoming increasingly vital. Remote IoT web SSH server on Windows 10, for example, provides users with a secure, browser-based gateway to manage Internet of Things (IoT) devices from any location with an internet connection. SSH, at its core, is a cryptographic protocol, a secure channel woven across the often-unsecured tapestry of a network. Its the digital equivalent of a highly guarded vault, ensuring that the data flowing between your device and the server remains private and unaltered.
Imagine a scenario where you can troubleshoot devices remotely, transfer files with ease, and execute commands directly, all from the comfort of your current location. With SSH as your cornerstone, this vision quickly transforms into a tangible reality. You are no longer tethered to the physical proximity of your devices. The limitations of location have faded, replaced by the freedom of remote control. The benefits extend beyond the simple act of access. Its a question of efficiency. It's a matter of security. It's about maximizing productivity, especially in a world where time is a valuable commodity.
Let's delve into the specifics of creating your own remote control system using a Remote IoT web SSH server on Windows 10. Setting up a Remote IoT web SSH server on Windows 10, might sound like a complex procedure, but with a focused approach and step-by-step clarity, the process is actually quite manageable, and even simple, and will be a rewarding achievement. It allows for secure access to your system from any location. This has become increasingly important as the world has embraced remote work. Having a reliable and secure connection to your devices has become essential. In the domain of technology, the Remote IoT web SSH server provides the solution that is needed. It gives the user the flexibility and security to manage all of your devices from anywhere.
Whether you're a seasoned IT professional, a dedicated developer, or a forward-thinking business, establishing secure remote access is no longer merely a convenience; it has ascended to a crucial requirement. The demand for secure remote management solutions has escalated in response to technological advances. Many individuals and businesses have started to rely on remote IoT devices, the demand for secure remote access continues to grow, which is why Remote IoT web SSH server has become such a vital tool.
Before you start, Its a good idea to verify a few preliminary steps: First of all, ensure that you are running on a version of Windows 10. This includes the Home, Pro, or Enterprise editions. It is also important to ensure that you have a stable internet connection. It is worth noting that, the connection needs to be active to maintain the server, and the SSH client connection. Next, youll want to check if the necessary network ports are open and available for use.
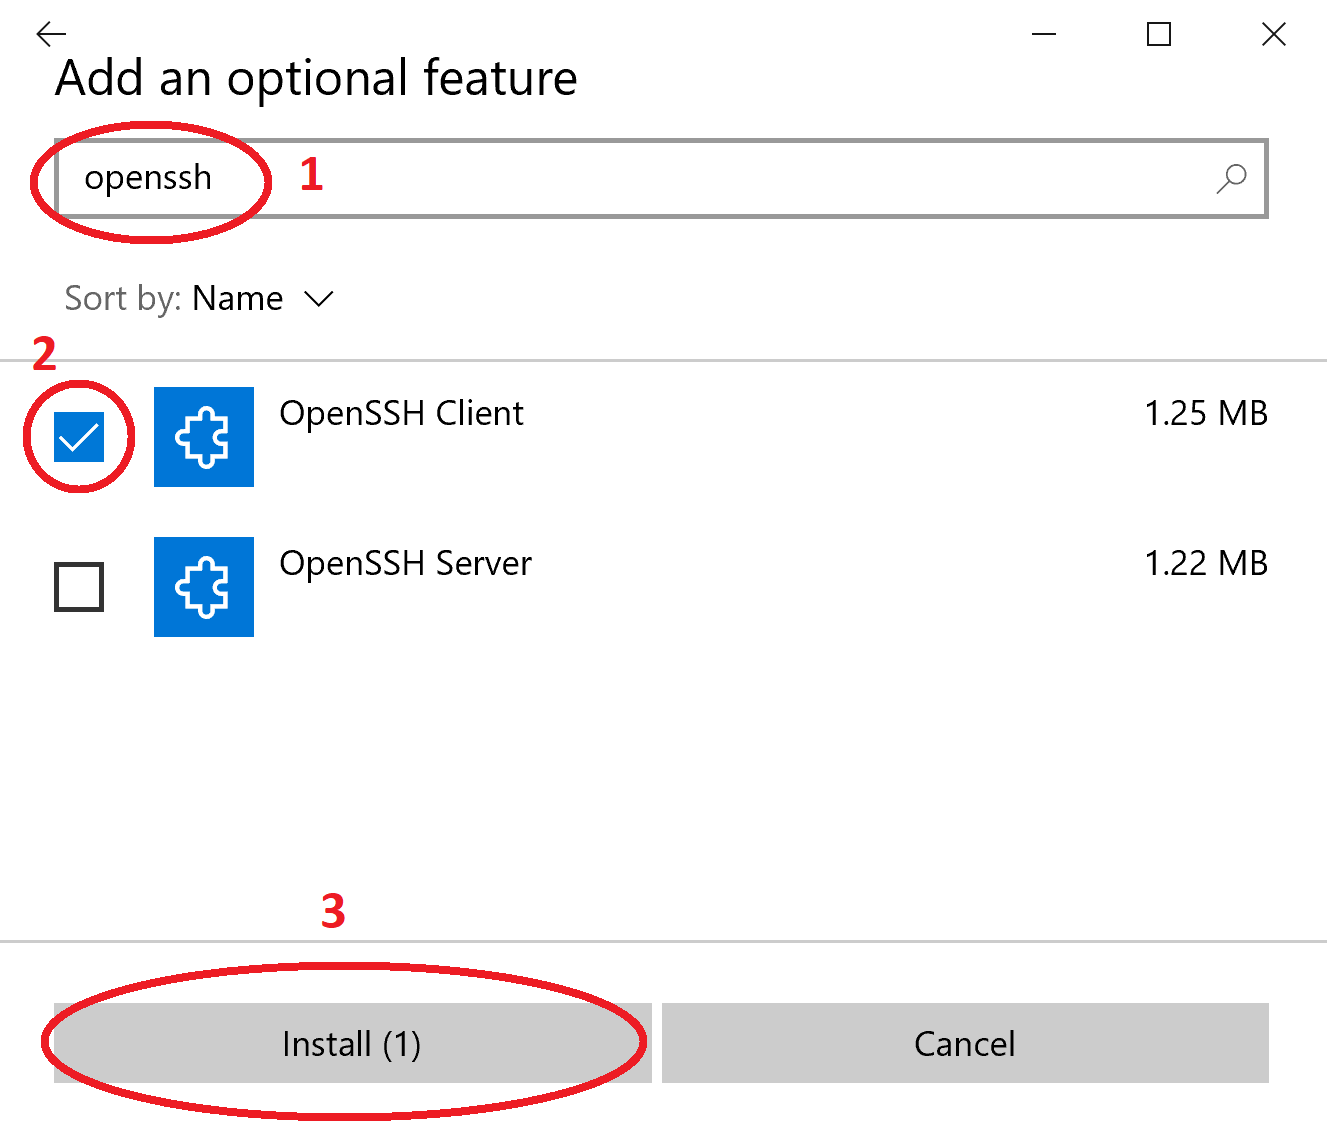
The following data presents a clear and concise guide, designed to lead you through the key steps of installing and setting up the server. The first step is to install an SSH server on your Windows 10 machine. The most common method involves using OpenSSH, which is a widely used and robust SSH implementation. To check to see if OpenSSH is installed and operational on your device, follow these simple steps. First, open the Settings app on your Windows 10 PC. Click on "Apps," and then go to "Apps & features." Look for "Optional features" and click to open. After that, check to see if "OpenSSH Server" is listed. If it isn't, click "Add a feature" and search for "OpenSSH Server," then click "Install." The Windows firewall will likely block the SSH server if it is not configured properly, so configuration is critical.
After installing OpenSSH Server, you'll need to start the SSH service. To do this, type Services in the Windows search bar and open the Services app. Scroll down until you find "OpenSSH SSH Server." Right-click it, and select "Properties." In the "Startup type" dropdown, select "Automatic" to ensure that the server starts automatically when your computer boots up. Then, click "Apply" and "OK." Next, you need to ensure that the SSH service is running. In the Services app, right-click on "OpenSSH SSH Server" again and click "Start" if it's not already running. If all goes smoothly, the service will start. You may also want to check that the server is listening on the correct port.
The next phase involves firewall configuration. Windows Firewall often blocks inbound connections, so you'll need to create a rule that allows SSH traffic. In the Windows search bar, type "Windows Defender Firewall with Advanced Security" and open it. In the left-hand menu, click on "Inbound Rules." In the right-hand pane, click on "New Rule..." Select "Port" and click "Next." Choose "TCP" and specify port 22 (the standard SSH port) and then click "Next." Select "Allow the connection" and click "Next." Make sure "Domain," "Private," and "Public" are all checked, then click "Next." Give the rule a descriptive name, such as "Allow SSH," and click "Finish." This will ensure that your firewall permits incoming SSH connections.
Now, to verify that everything is working, open a command prompt or PowerShell. Type "ipconfig" and press Enter. Look for your IPv4 address. This is the IP address you will use to connect to your server from another device on the same network. If you want to access your SSH server from outside your local network, you'll need your public IP address, which can be found by searching "what is my IP" on any search engine. Then, from another device (like another computer or a smartphone), open an SSH client (such as PuTTY, or the built-in SSH client in Linux/macOS). Enter your server's IP address (either local or public) and port 22 (or your custom port if you changed it). When prompted, enter your Windows username and password. If you've configured everything correctly, you should be logged into your Windows 10 machine via SSH. The moment of truth is near.
Once you've logged in, you can execute commands on your Windows 10 machine remotely. You can manage files, run applications, and perform other system administration tasks. Some of the most common tasks for an SSH user are to manage the files on the server. This typically involves transferring files and managing them. Additionally, it can be used for system maintenance and configuration. This includes tasks such as starting, stopping, or restarting services, viewing system logs, or modifying system settings. Lastly, a primary function is the execution of remote applications. This may include running scripts.
To ensure the ongoing security of your Remote IoT web SSH server, consider these best practices. Regularly update your Windows 10 system and OpenSSH server to patch any security vulnerabilities. When creating accounts, always use strong passwords and enable multi-factor authentication (MFA) for an extra layer of security. Change the default SSH port (22) to a less common port to reduce the risk of automated attacks. Always limit the number of users who have access to your SSH server and implement proper access controls. Regularly review your server logs for any suspicious activity, such as unauthorized login attempts or unusual command executions. When it comes to your server, security is a continuous and ever-evolving process.
What about the web interface? A web interface provides a more user-friendly and accessible way to connect to your SSH server, especially for users who are not familiar with command-line interfaces. Setting up a web SSH client on Windows 10 is similar to setting up an SSH server, but it involves additional steps to integrate the SSH functionality with a web server. Some popular web SSH clients include Apache Guacamole, and Termius. Each client has its own set of features and configuration options.
Let's take a look at Apache Guacamole. Apache Guacamole is a clientless remote desktop gateway that can be accessed via a web browser. It supports SSH, VNC, RDP, and other protocols. To install Apache Guacamole on Windows 10, you will need to install a web server like Apache Tomcat, which is a commonly used open source web server.
Install Apache Tomcat, and then you need to download the Guacamole web application (.war file) from the official Apache Guacamole website and deploy it to the Tomcat web server. After that, you'll need to configure Guacamole to connect to your SSH server by modifying the configuration file (guacamole.properties) to specify the SSH server's IP address, port, username, and password. The precise steps may vary. Be sure to always consult the official documentation for the latest installation and configuration instructions. After that, make sure you have successfully installed Apache Tomcat, deployed the Guacamole web application, and configured it to connect to your SSH server. Open a web browser and navigate to the Guacamole web interface, usually accessible at http://your-server-ip:8080/guacamole. Log in using your configured credentials.
The advantages of Guacamole include a web-based access which provides easy and accessible control of your IoT devices. It has multi-protocol support including SSH. It works from any device with a web browser. The setup, however, might involve configuring multiple components, which might require the user to have advanced technical knowledge. Security relies on all of the components involved. The user is responsible for ensuring that all components are secure and properly configured.
As you embark on this journey, remember that the world of technology is in constant motion. While this guide provides a comprehensive overview, the specific requirements and solutions will always evolve. So, to fully capitalize on the full capabilities of the Remote IoT web SSH server, it's advisable to continually seek up-to-date information.

