Secure SSH: Your Remote IoT Tutorial & Guide - 2024
How can one securely manage and interact with Internet of Things (IoT) devices deployed in remote locations? The ability to leverage SSH, a robust and widely-used protocol, provides a secure tunnel for accessing and controlling these devices, enabling troubleshooting, configuration changes, and data retrieval without physical access. This opens up a world of possibilities for developers and engineers working with IoT, allowing for efficient device management and reduced downtime.
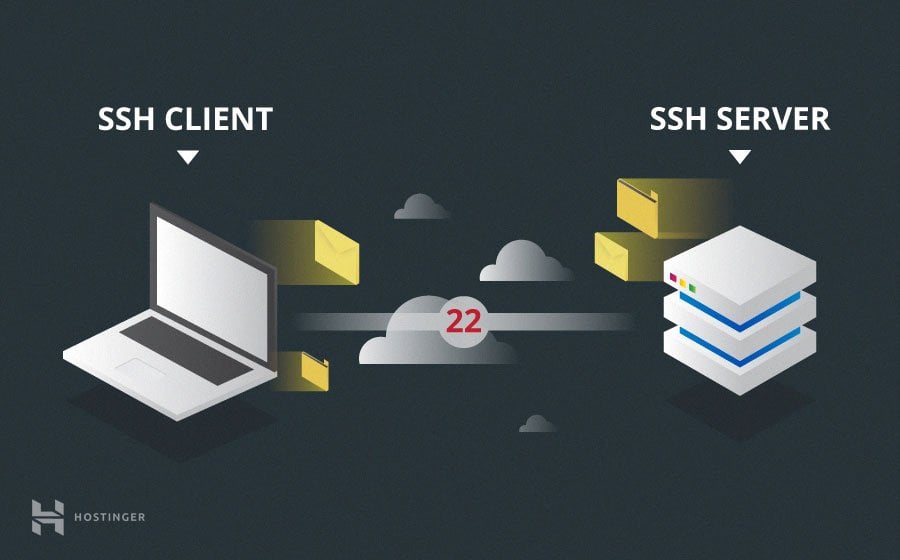
The core of remote IoT management often revolves around Secure Shell (SSH), a cryptographic network protocol that provides secure communication over an unsecured network. SSH enables a secure channel between a local machine (your laptop, for instance) and a remote IoT device, allowing you to execute commands, transfer files, and even forward ports. This is particularly crucial in scenarios where direct physical access to the IoT device is impractical or impossible, such as deployments in geographically dispersed locations or in areas with limited accessibility.
SSH's strength lies in its security features. It encrypts all traffic between the client and the server, preventing eavesdropping and unauthorized access. It also supports authentication mechanisms such as passwords, public-key cryptography, and multi-factor authentication. These features ensure that only authorized users can access and control the remote IoT devices, mitigating security risks.
To begin, let's examine the fundamental elements required to establish an SSH connection to a remote IoT device. First and foremost, you will need an IoT device that has an SSH server running. This is typically achieved by installing an SSH server package on the device, which could be a Raspberry Pi, an Arduino with Ethernet, or any other embedded system capable of running an SSH daemon. The specific package and installation instructions will vary based on the operating system of the device. Common options include OpenSSH for Linux-based systems.
Secondly, you need a client machine, usually your laptop or workstation, with an SSH client installed. Most operating systems, including Linux, macOS, and Windows (via the command line or tools like PuTTY), come with a built-in SSH client. If you are using Windows, you may need to enable the OpenSSH client feature or install a third-party SSH client like PuTTY.
Then comes the essential aspect: the network. Both the IoT device and the client machine must be on a network that can communicate with each other. This can be a local network (LAN), a virtual private network (VPN), or even the Internet. If the IoT device is behind a firewall or router, you will need to configure port forwarding on the router to allow SSH connections to the device. Typically, SSH uses port 22, although you can change this for security reasons. Port forwarding essentially directs incoming traffic on a specific port of your router to a specific device on your local network.
Finally, you require the necessary credentials: a username and password or, ideally, SSH keys. SSH keys offer a more secure authentication method than passwords. They involve generating a pair of keys: a private key, which you keep secret, and a public key, which you place on the remote device. When connecting, the SSH client uses the private key to prove your identity to the server, which verifies it using the public key.
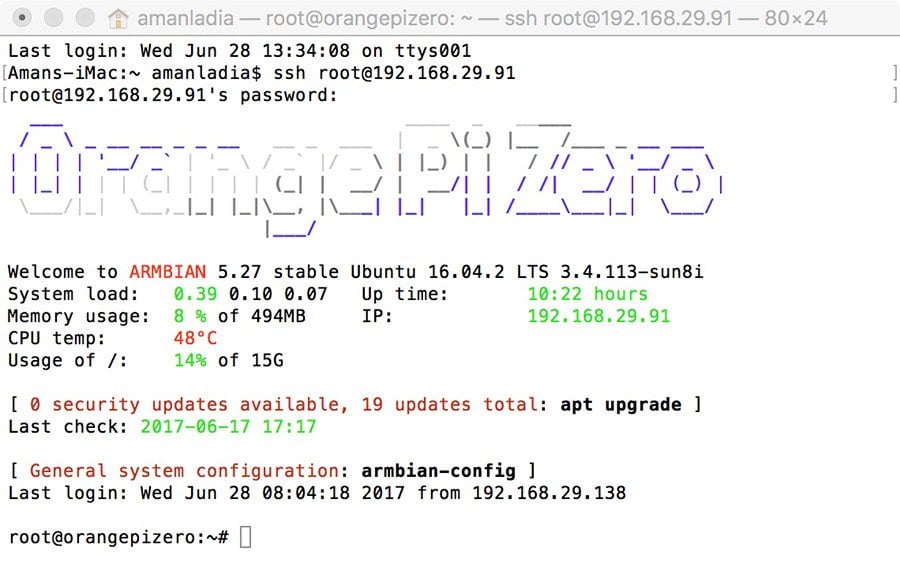
The basic command-line syntax for connecting to an SSH server is as follows:
ssh username@ip_address_or_hostnameReplace "username" with the username on the remote device and "ip_address_or_hostname" with the IP address or hostname of the device. You might be prompted for the password associated with the username. If you are using SSH keys, the client will automatically attempt to use your private key.
Once you have established an SSH connection, you can execute commands on the remote device as if you were sitting in front of it. For example, you can list files, create directories, run scripts, and monitor system processes. This remote access capability is extremely powerful and allows for a wide array of management tasks.
A crucial aspect of secure IoT management via SSH is key-based authentication. Using SSH keys instead of passwords dramatically reduces the risk of unauthorized access. To generate an SSH key pair, use the `ssh-keygen` command on your client machine. This will create a private key (which you keep secure) and a public key (which you copy to the remote device). You then configure the SSH server on the IoT device to accept authentication using this public key, effectively bypassing password authentication.
The process of generating and deploying SSH keys can be broken down into several steps. First, generate the key pair. On your local machine, open a terminal and type `ssh-keygen -t rsa -b 4096`. This command generates an RSA key with a length of 4096 bits, considered strong and secure. You will be prompted to choose a location to save the key (the default is fine) and to create a passphrase for the private key (recommended). The passphrase adds another layer of security to your private key.
Next, copy the public key to the IoT device. You can use the `ssh-copy-id` command, which simplifies this process: `ssh-copy-id username@ip_address_or_hostname`. This command prompts for your password on the remote device and then copies your public key to the `~/.ssh/authorized_keys` file on the remote device. Alternatively, you can manually copy the content of your public key (usually located at `~/.ssh/id_rsa.pub`) to the `~/.ssh/authorized_keys` file on the IoT device.
Once the public key is in place, you can try logging in without a password: `ssh username@ip_address_or_hostname`. If everything is configured correctly, you should be able to log in using your private key, and the server will authenticate you automatically, prompting only for your passphrase (if you set one) when you attempt your initial connection. This secure authentication method significantly enhances your remote access.
Beyond basic command execution, SSH allows for more advanced features like port forwarding. Port forwarding is a technique that allows you to access services running on the remote IoT device through your local machine. It is invaluable for scenarios where services are running on the device but are not directly exposed to the outside world.
There are three main types of SSH port forwarding: local port forwarding, remote port forwarding, and dynamic port forwarding. Local port forwarding allows you to access a service running on the remote device from your local machine. For instance, if you have a web server running on your IoT device at port 80, you can use local port forwarding to access the web server through a port on your local machine (e.g., port 8080). The command would look something like this: `ssh -L 8080:localhost:80 username@ip_address_or_hostname`
Remote port forwarding does the opposite. It allows a service running on your local machine to be accessed from the remote device. Dynamic port forwarding creates a SOCKS proxy server on your local machine, allowing you to route traffic through the SSH connection. The choice of which type of port forwarding to use depends on the specific requirements of your application and network configuration.
Implementing port forwarding involves specifying the ports you want to forward and the destination address and port. The `-L` option for local port forwarding, `-R` for remote port forwarding, and `-D` for dynamic port forwarding are the key flags to achieve this functionality. Understanding these options is crucial for effectively managing and troubleshooting remote devices and applications.
Security is paramount when working with SSH and IoT. Always keep your SSH software up to date to patch known vulnerabilities. Disable password authentication if you are using SSH keys. Use strong passphrases to protect your private keys. Consider changing the default SSH port (22) to a less common port to reduce the risk of automated attacks. Regularly audit your SSH configurations and access logs to detect any suspicious activity.
Furthermore, limit the scope of access. Only grant access to necessary users and implement access control lists (ACLs) to restrict the commands that can be executed. Regularly review and revoke access when it's no longer needed. Using a firewall on the IoT device and/or the network it is connected to can also provide an additional layer of protection by controlling incoming and outgoing traffic.
Another important aspect of securing your IoT infrastructure is monitoring and logging. Configure the SSH server to log all successful and failed login attempts. Analyze these logs regularly for suspicious activity, such as brute-force attacks or unauthorized access attempts. You can use tools like `fail2ban` to automatically block IP addresses that exhibit malicious behavior, such as repeated failed login attempts.
Moreover, consider using a VPN (Virtual Private Network) to provide an additional layer of security for your SSH connections. A VPN encrypts all network traffic between your client machine and the VPN server. This means that even if someone intercepts the SSH traffic, they won't be able to decrypt it. You can then SSH to your IoT devices through the VPN connection. This added security is particularly beneficial when connecting from public or untrusted networks.
Automation can streamline and improve efficiency in remote IoT device management. Tools like Ansible and Chef allow you to automate tasks such as software updates, configuration changes, and system monitoring across multiple devices simultaneously. These tools use SSH as their primary method of communication with remote hosts. You can write playbooks or recipes that define the desired state of your devices and then automatically deploy these configurations using SSH.
Let's consider an example. Imagine you have a fleet of Raspberry Pi devices deployed in a smart agriculture project, collecting environmental data from sensors. Using SSH, you could create an Ansible playbook that does the following:
- Updates the operating system on all the Raspberry Pis.
- Installs the latest versions of the sensor data collection software.
- Configures the devices to automatically upload the collected data to a central server.
- Monitors the devices for errors and sends alerts if any issues arise.
This automation significantly reduces the time and effort required to manage a large number of devices and ensures consistency across the fleet. It also minimizes the risk of human error during manual configuration.
SSH also facilitates file transfer between the client machine and the remote IoT device. The `scp` (secure copy) command is a secure alternative to the older `rcp` command. It uses SSH to encrypt the file transfer process, protecting the confidentiality of the data. The `scp` command has a syntax similar to the `cp` command (copy) in Linux.
To copy a file from your local machine to the remote device, use the following command: `scp /path/to/local/file username@ip_address_or_hostname:/path/to/remote/directory`. To copy a file from the remote device to your local machine, use: `scp username@ip_address_or_hostname:/path/to/remote/file /path/to/local/directory`.
SFTP (SSH File Transfer Protocol) is another method for secure file transfer over SSH. SFTP provides a more interactive and feature-rich environment than `scp`. It supports features like resuming interrupted transfers, directory listing, and file permissions management. SFTP is accessed using an SFTP client, which can be a command-line tool (e.g., the `sftp` command) or a graphical user interface (GUI) such as FileZilla or WinSCP.
Choosing between `scp` and SFTP often depends on your needs. If you require a simple, quick way to transfer files, `scp` is often sufficient. For more complex file management tasks, SFTP offers greater flexibility and control. Some SFTP clients provide an easy-to-use, drag-and-drop interface, which can make file transfers even more convenient.
Troubleshooting SSH connections to remote IoT devices can involve several steps. First, verify basic network connectivity. Can you ping the IP address of the device? If not, there is likely a network issue. Check your firewall rules to ensure SSH traffic (typically on port 22) is allowed. If the device is behind a router, ensure that port forwarding is correctly configured.
If you can ping the device but cannot SSH, check the SSH service status on the remote device. Is the SSH server running? You can usually check this with a command like `sudo systemctl status sshd` on Linux systems. If the SSH server is not running, start it using `sudo systemctl start sshd`. Check the SSH server's log files (e.g., `/var/log/auth.log` or `/var/log/syslog`) for any error messages. These logs often provide valuable clues about why the connection is failing.
Incorrect SSH configuration is a common cause of connection problems. Verify that the SSH configuration file (`/etc/ssh/sshd_config`) on the remote device is correctly configured. Common settings to check include: `Port` (the port the SSH server is listening on), `PermitRootLogin` (whether root login is allowed), `PasswordAuthentication` (whether password authentication is enabled), and `AllowUsers` or `DenyUsers` (which users are allowed or denied access). Any changes made to the configuration file typically require a restart of the SSH service (e.g., `sudo systemctl restart sshd`).
Incorrect authentication credentials are another frequent culprit. Double-check the username and password (or, if using SSH keys, ensure the public key is correctly installed on the remote device). Incorrect permissions on the `~/.ssh` directory or the `authorized_keys` file can also cause authentication failures. The `~/.ssh` directory should typically have permissions `700` (rwx------), and the `authorized_keys` file should have permissions `600` (rw-------).
Furthermore, consider network latency. If the connection is slow, SSH might time out. In the SSH client's configuration file (e.g., `/etc/ssh/ssh_config` on Linux), you can adjust the `ConnectTimeout` and `ServerAliveInterval` settings to increase the timeout duration and send keep-alive messages, respectively. These settings can help maintain the connection and make SSH more responsive over slower or unreliable networks.
Remote IoT management using SSH is a powerful and flexible tool, but it comes with responsibilities. Always prioritize security. Regularly update your software and hardware. Use strong authentication methods like SSH keys. Implement proper access control and monitoring. Embrace automation to streamline tasks. By following best practices, you can harness the full potential of SSH while mitigating the risks involved. The ability to securely manage devices remotely is a cornerstone of effective IoT deployments, whether for individual hobbyists, small businesses, or large-scale industrial projects.


 devices deployed in remote locations? The ability to leverage SSH, a robust and widely-us)