[Free!] Raspberry Pi Remote Control IoT App - Build Now!
Can you truly build a sophisticated, remotely controlled Internet of Things (IoT) system for free, leveraging the power of a Raspberry Pi? The answer, surprisingly, is a resounding yes. The combination of a Raspberry Pi, open-source software, and readily available online resources provides a powerful and cost-effective pathway to crafting your own home automation, robotics, or data acquisition projects all without emptying your wallet.
The beauty of this approach lies in its accessibility. The Raspberry Pi itself is inexpensive, and the vast ecosystem of free software, libraries, and community support makes it a playground for tinkerers and seasoned engineers alike. Forget expensive proprietary systems; we're diving into a world where creativity and resourcefulness are the only limits. This exploration will delve into the essential components, practical applications, and the specific tools needed to transform your vision of a remotely controlled IoT system into reality. We'll investigate the crucial aspects of remote access, data transmission, and the user interface all while keeping the "free" mantra at the forefront. Building an IoT system with free tools isn't just about saving money; its about empowering yourself with the knowledge and skills to shape your digital environment.
Let's consider a foundational element of any remote control system: the Raspberry Pi itself. This tiny computer, often smaller than a deck of cards, serves as the brains of the operation. Its a versatile platform capable of running a wide array of operating systems, with Raspbian (a Debian-based Linux distribution) being the most popular choice. Raspbian offers a user-friendly interface, extensive software repositories, and a vibrant community dedicated to supporting its users. The Raspberry Pi's built-in Wi-Fi or Ethernet connectivity allows it to communicate with your local network and, crucially, the internet. This connectivity is the gateway to remote control, allowing you to interact with your system from virtually anywhere in the world. Beyond the core functionality, the Raspberry Pis GPIO (General Purpose Input/Output) pins provide the physical connections to the real world. These pins allow you to connect sensors, actuators, and other devices, enabling you to control lights, motors, relays, and much more. The versatility of the GPIO pins, combined with the Pis computational power, makes it an ideal platform for a diverse range of IoT projects.
The choice of programming language is another critical consideration. Python reigns supreme in the Raspberry Pi and IoT world, offering a gentle learning curve, extensive libraries, and a vast community support network. Pythons readability makes it easier to write and debug code, even for those new to programming. Libraries like RPi.GPIO simplify the interaction with the GPIO pins, enabling you to control hardware with minimal effort. Furthermore, Python boasts libraries specifically designed for networking and web development, streamlining the process of creating a remote control interface. Beyond Python, you can also explore other languages, such as C/C++, for performance-critical tasks or Javascript for web-based interfaces, though Python usually serves as the primary language.
Now, let's address the crucial element of remote access. How do you interact with your Raspberry Pi from outside your local network? Several free and open-source options exist. One popular method is using a service like SSH (Secure Shell) combined with a dynamic DNS service (like No-IP or DuckDNS). SSH allows you to securely connect to your Raspberry Pi's command line from anywhere with an internet connection. The dynamic DNS service ensures that you can always reach your Pi, even if its public IP address changes. Another option is to leverage a web server, such as Apache or Nginx, running on your Raspberry Pi. This allows you to create a web-based control panel that you can access through a web browser. The web server would host your HTML, CSS, and JavaScript code, which would communicate with Python scripts running on the Pi to control your connected devices. Finally, consider using a VPN (Virtual Private Network) to create a secure tunnel to your home network. This gives you secure access to your Raspberry Pi and other devices as if you were on your local network.
Data transmission is another key consideration. How do you get information from your sensors and actuators to your remote interface, and vice versa? Several protocols and technologies can facilitate this. MQTT (Message Queuing Telemetry Transport) is a lightweight messaging protocol specifically designed for IoT applications. MQTT uses a publish/subscribe model, where devices publish data to a central broker, and clients subscribe to receive that data. MQTT is well-suited for transmitting sensor data, control commands, and other information in a resource-efficient manner. Another option is to use HTTP (Hypertext Transfer Protocol) the same protocol that powers the web. Your Raspberry Pi can act as an HTTP server, providing an API (Application Programming Interface) that allows your remote interface to send commands and retrieve data. Finally, consider using a database, such as SQLite, to store sensor data locally on your Raspberry Pi. This allows you to collect and analyze data over time. You can then build a web interface or use a charting library to visualize the collected data remotely.
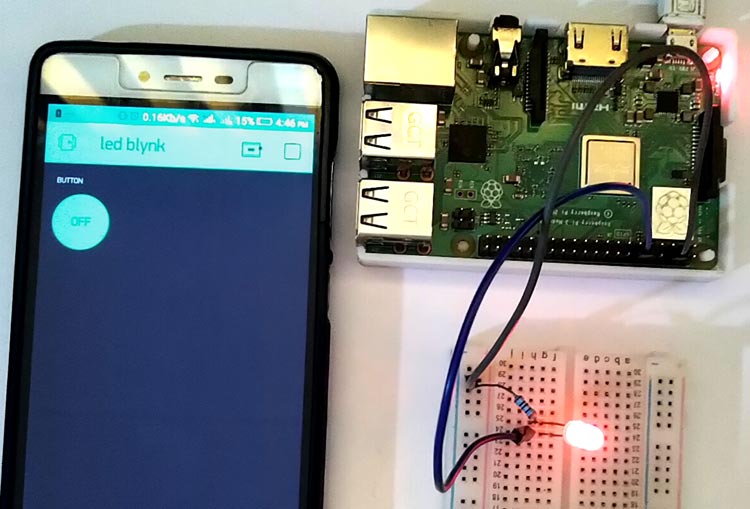
Creating the user interface is paramount for usability. It is the primary point of interaction. If your interface is not user-friendly, controlling your system can become a frustrating experience. For web-based interfaces, HTML, CSS, and JavaScript are the fundamental building blocks. HTML defines the structure of your page, CSS provides the styling, and JavaScript handles the interactive elements and communication with the Raspberry Pi. Frameworks like Bootstrap and Materialize simplify the process of creating responsive and visually appealing interfaces. For mobile applications, consider using frameworks like React Native or Flutter, allowing you to build cross-platform mobile apps that can control your Raspberry Pi from your smartphone or tablet. Keep the interface simple and intuitive, with clear controls and feedback mechanisms. Consider adding features like real-time data displays, logging capabilities, and customizable settings to enhance the user experience.
Let's delve deeper into some practical project examples. Imagine building a smart home lighting system. You could use the Raspberry Pi to control lights throughout your house remotely. You'd connect relays to the GPIO pins to switch the lights on and off. You could then create a web interface or mobile app to control the lights from anywhere. You could also add sensors, such as light sensors and motion detectors, to automate the lights. Another example is a home security system. You could connect sensors like door and window sensors to the GPIO pins, along with a camera. The Raspberry Pi could monitor these sensors and trigger an alarm, send notifications, and record video if a security breach is detected. For a robotic project, you could control a robot remotely. You could use the Raspberry Pi to control the robot's motors and sensors, allowing you to drive the robot around and collect data. These are just a few examples of the many possibilities with a Raspberry Pi and free software. The only limit is your imagination.
The process of building a free IoT app using a Raspberry Pi typically involves several key steps. First, you'll need to set up your Raspberry Pi, which includes installing the operating system (usually Raspbian), configuring network settings, and enabling SSH access. Second, you'll need to connect your hardware components to the GPIO pins of the Raspberry Pi. This might involve connecting sensors, actuators, or other devices. Third, you'll need to write the software to control your hardware. This typically involves writing Python scripts that interact with the GPIO pins and manage the data transmission and remote access. Fourth, you'll need to create a user interface, which could be a web interface, a mobile app, or another type of interface. This interface will allow you to control your system remotely. Finally, you'll need to test and debug your system. This involves testing the functionality of your system and making any necessary adjustments.
Consider the security implications. Since your Raspberry Pi will be accessible from the internet, its crucial to secure your system. Change the default password for the "pi" user and create a strong password. Enable two-factor authentication for SSH access if possible. Keep your operating system and software up to date with the latest security patches. Use a firewall to restrict access to your Raspberry Pi. Avoid exposing sensitive information in your code or web interface. Regularly audit your system for vulnerabilities. Secure your network by using a strong Wi-Fi password and encrypting your network traffic. These security measures help protect your system from unauthorized access and potential attacks.
The world of "free" IoT with a Raspberry Pi is also enriched by its vibrant community. Numerous online forums, tutorials, and communities provide support, inspiration, and ready-made solutions. Websites like the Raspberry Pi Foundation's official website and other enthusiast groups contain a wealth of information, from introductory guides to advanced project tutorials. Stack Overflow, GitHub, and other code-sharing platforms host countless examples of code and solutions. Don't hesitate to ask questions, share your creations, and contribute to the community. The collective knowledge and experience of the community can accelerate your learning curve and help you overcome any challenges you encounter. This collaborative environment fosters innovation and encourages experimentation. Embrace the open-source spirit by sharing your code and contributing to the broader ecosystem. This collaborative approach is central to building robust and scalable IoT systems.
As a final thought, the "free" aspect of this project doesn't mean "easy". Youll need to invest time and effort to learn the necessary skills and build your system. However, the rewards are significant. Youll gain valuable skills in programming, electronics, networking, and web development. You'll have the satisfaction of building something tangible and useful. Youll have the freedom to customize your system to meet your specific needs. And you'll have the opportunity to learn and grow in an exciting and rapidly evolving field. The journey itself, from initial concept to functional system, is often the most rewarding part of the process. Embrace the challenges, celebrate the successes, and enjoy the process of building your own remotely controlled IoT app with a Raspberry Pi, all for free.
This article has focused on the core concepts and technologies. However, let's summarize some key considerations. The Raspberry Pi offers an accessible and cost-effective platform for building remote-controlled IoT applications. Python is the preferred programming language due to its ease of use and extensive libraries. SSH, web servers, and VPNs provide secure remote access. MQTT and HTTP, along with databases, are essential for data transmission. HTML, CSS, and JavaScript, coupled with frameworks like Bootstrap and Materialize, are crucial for creating user-friendly interfaces. Security is paramount, and you must follow best practices to protect your system. Finally, the community provides a wealth of resources and support. By embracing these principles and resources, you can build powerful and customizable IoT applications without spending a fortune. The potential for innovation is vast, and the learning opportunities are immense. Get started today, and you will be surprised by what you can achieve.


 system for free, leveraging the power of a Raspberry Pi? The answer, surprisin)